
 Manual
 Firmware
 Software
 Useful terms
 FAQ
FAQ Guarantee terms and conditions
3DGENCE SLICER
-
Bridge
A part of model printed in the air, suspended between two parts of the print. It is subject to special calculations while preparing the file for printing. If the bridge is too long, it may be subject to deformation. In such cases this component should be supported with support structures.
-
Autocompensation
Consists in a single-point measurement of the distance to bed and determining a correct distance to start a job. This process takes place each time before printing. After setting a correct height over a single point, further part of the print will be performed by taking into account the table curve pattern stored in the printer memory – thanks to this, the distance between the nozzle and working table is always the same and corrected in Z-axis on a continuous basis.
-
ABS
Poly acrylonitrile butadiene styrene – apart from PLA one of the main materials for 3D printers. Features a high impact strength, hardness and resistance to scratching. It is not resistant to UV radiation. Soluble in acetone, which allows for post-processing of prints by using the acetone vaporizing method. ABS prints can also be glued together with ABS solved in acetone. ABS features a fairly significant thermal shrinkage (up to 0.7%). The typical operating temperature for ABS is 220 to 250 Celsius degrees and about 100 Celsius degrees for the bed. The heated working space is necessary to maintain dimensional compatibility for printed items.
-
Adhesion
In the 3D print context it means the adhesion to the device bed. Insufficient print adhesion can result in partial or complete tear of the print from the table during printer operation. The ceramic table of the 3DGence printers provides a good adhesion for the certified materials, however for hard to print plastics there is a lot of commercial solutions available for improving adhesion of the print to the bed. Grease or soiling on the table has a negative impact on adhesion.
-
Autocalibration
A printer capacity to perform an automated bed calibration. This process is designed to generate curve and irregularity maps for the working table and by introducing dynamic corrections it provides a constant height of the nozzle over the bed. It usually takes from a few to several dozen minutes, and necessary user operations are reduced to starting the process by using an appropriate command.
How to turn on the printer for the first time?
Please read the instruction added to the printer before turning it on for the first time (Quick Start Quide).
- Take the printer, accessories and filament out of the box.
- Remove the yellow shipping clips.
- Remove the security foil from the plastic covers. Attach covers to the printer sides.
- Install the spool holder on the right side of the device (WARNING! Left handed thread).
- Attach the filament cleaner to the upper side of the printer with the allen tool provided with the package.
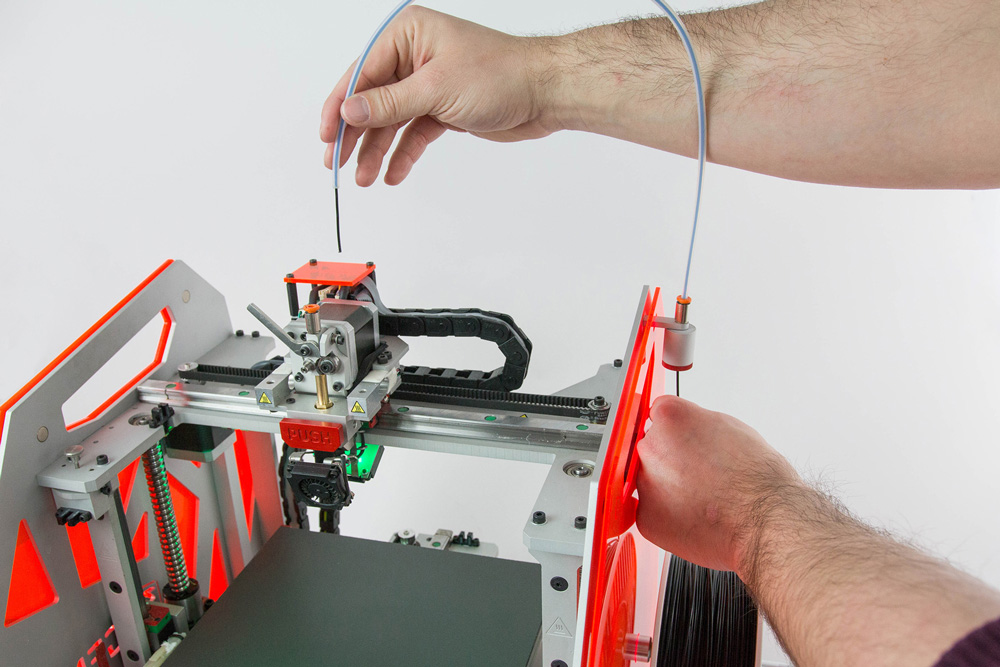
- Unpack the filament, cut its tip off with scissors and place it on the handle.
- Unlock the extruder by moving lever to the left (counterclockwise).
- Route the filament through the cleaner.
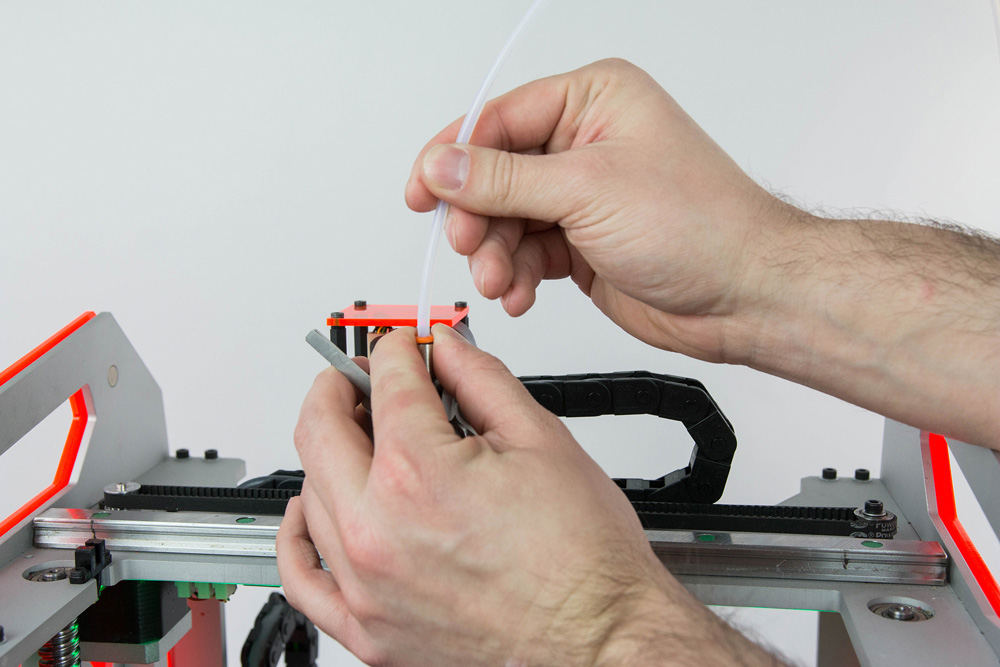
- In case the filament does not pass through the cleaner tube, follow the instructions below:

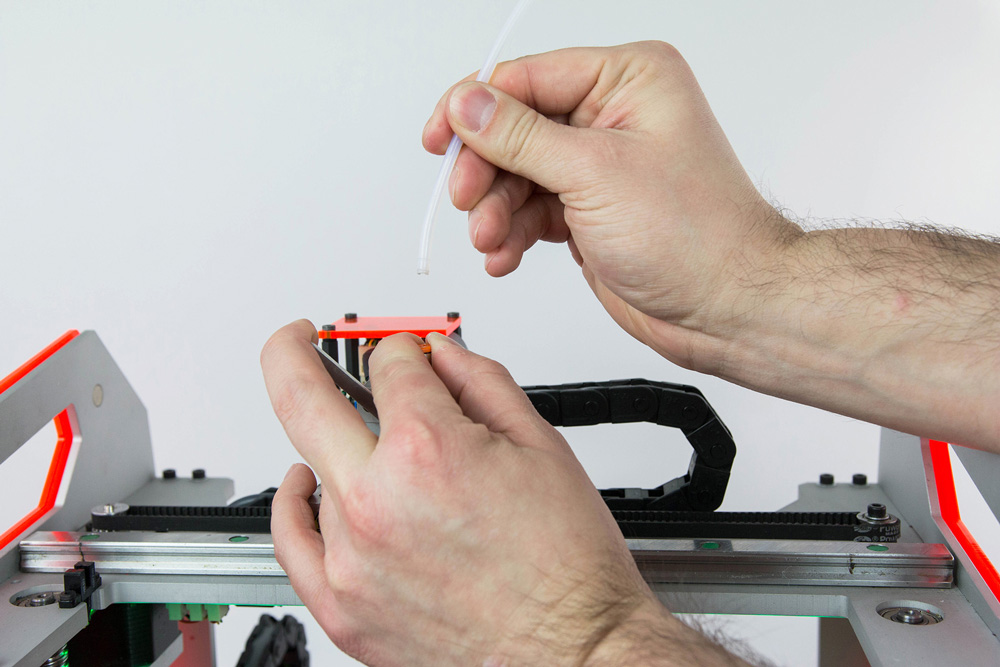
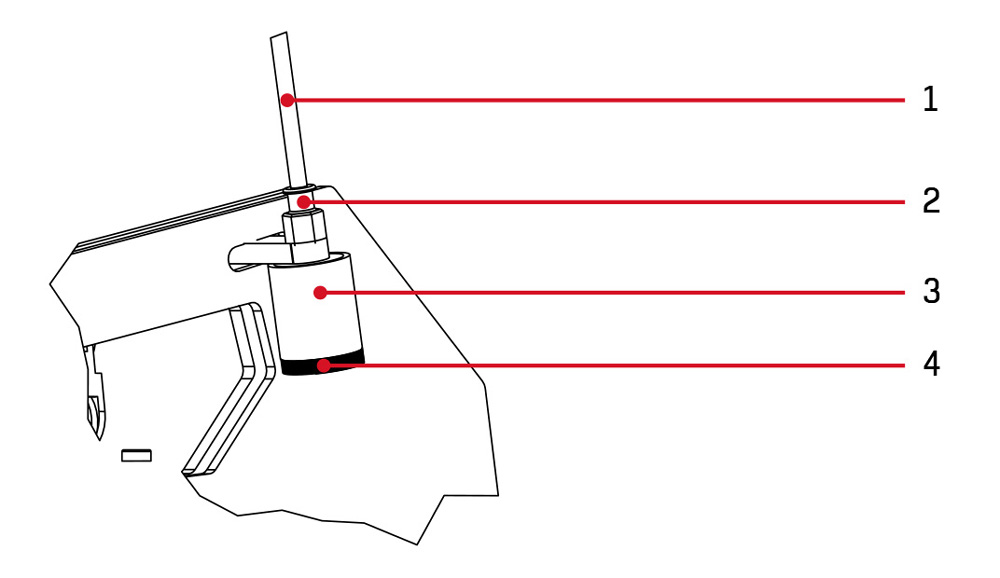
I. Remove the teflon tube (1) from the cleaner (3) – by pressing and holding the red clamping ring of the pneumatic coupling (2) and pull the tube out (1).
II. Unscrew the cleaner’s nut (4) and remove the sponge inlay (3).
III. Pass the filament through the hole of the cleaner’s cap (4) and then pierce the sponge located in the cleaning tool in the cleaning tool with the tip filament.
IV. Pass the filament through the sponge (3), insert the filament and the sponge to the cleaner and tighten all with the cleaner’s nut (4).
V. Push the filament through the teflon tube (1), strighten the end of it and insert it to pneumatic couple (2).
10. Strighten up the end of the filament and insert it into the hotend.
11. Attach the power cable to the printer.
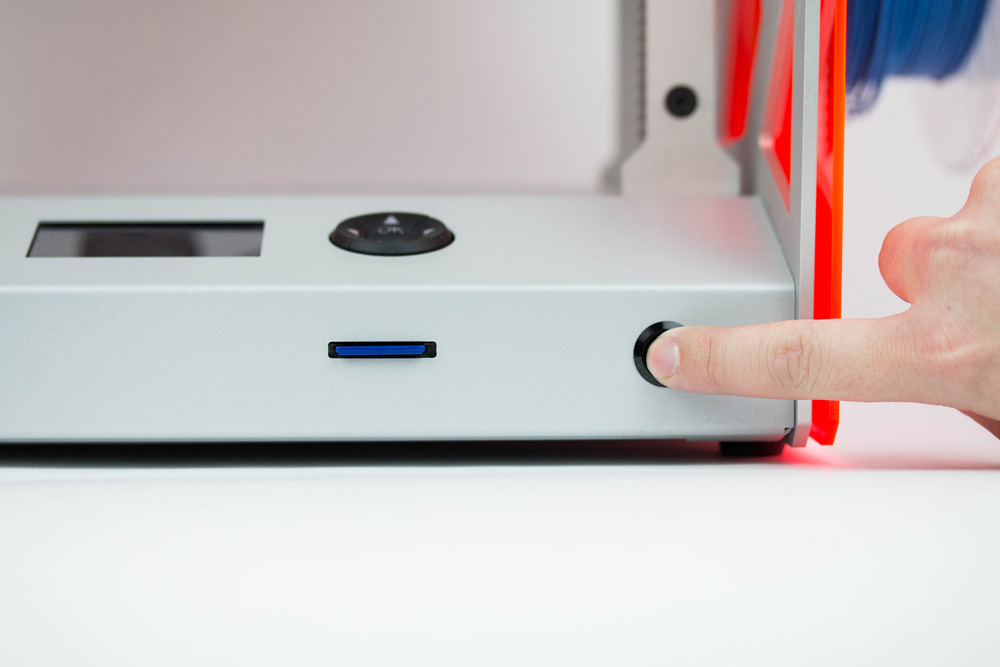
12. Turn the printer on.
13. Follow the WIZARD on the printer’s display.
Where is the serial number of the printer?
The printer’s serial number is on the sticker located on the back of the printer.
The serial number begins with the symbol: S/N ONE.

What are recommendations for printing on ceramic heatbed of 3DGence ONE printer?
The 3DGence ONE printer is equipped with a ceramic heatbed with high microporosity. Thanks to this, it is a good material for printing low-shrinkage materials (eg. PLA, elastic materials).
The use of other materials (eg. ABS, ASA, PET, PET-G, Nylon) requires to stick to the following producer’s recommendations, because material shrinkage and high adhesion to the heatbed can cause damage to the ceramics.
In order to reduce the risk of damage to the ceramic heatbed, it is recommended to:
- Use free, dedicated 3DGence Slicer software along with developed by producer profiles. The material profiles include the requirements of printing with shrinkable materials with use of ceramic heatbed. 3DGence Slicer software is available on the producer’s website: www.3dgence.com/support.
- Select the „raft” option in the print settings when using other software, eg. Simplify3D. The use of this option limits the contact area of the correct model with the ceramic surface significantly reducing the risk of ceramic damage.
- Before first printing, cover the ceramic heatbed with four thin layers of Dimafix in the liquid form. To do this, cover the clean ceramic with a layer of Dimafix, wait for it to dry. Repeat the procedure four times. Before the next prints, it is enough to cover the ceramic with one the preparation layer.
- After finishing the printing process, wait until the heatbed is cooled down. Safe removal of the model is possible only after the following information appears on the screen: „Remove Model”. Attempting to detach the model earlier may cause damage to the ceramic.
- In case of problems with the removing of a printed model, re-warm the heatbed to 70°C for about 5 minutes, cool down to 40°C and then remove the model from the heatbed. If it is necessary, repeat the procedure.
- Make sure that the printing has not been started too low to the heatbed. Too short distance between the ceramic and the hotend may cause the Dimafix layer to become damaged.
Manual correction of the distance between the heatbed and the nozzle of hotend:
- Up arrow on the left – movement of the heatbed upwards, one click of a 0.025 mm movement, allows you to adjust the height of the table during printing,
- Down arrow on the left – movement of the heatbed down, one click of 0.025 mm allows you to adjust the height of the heatbed during printing.
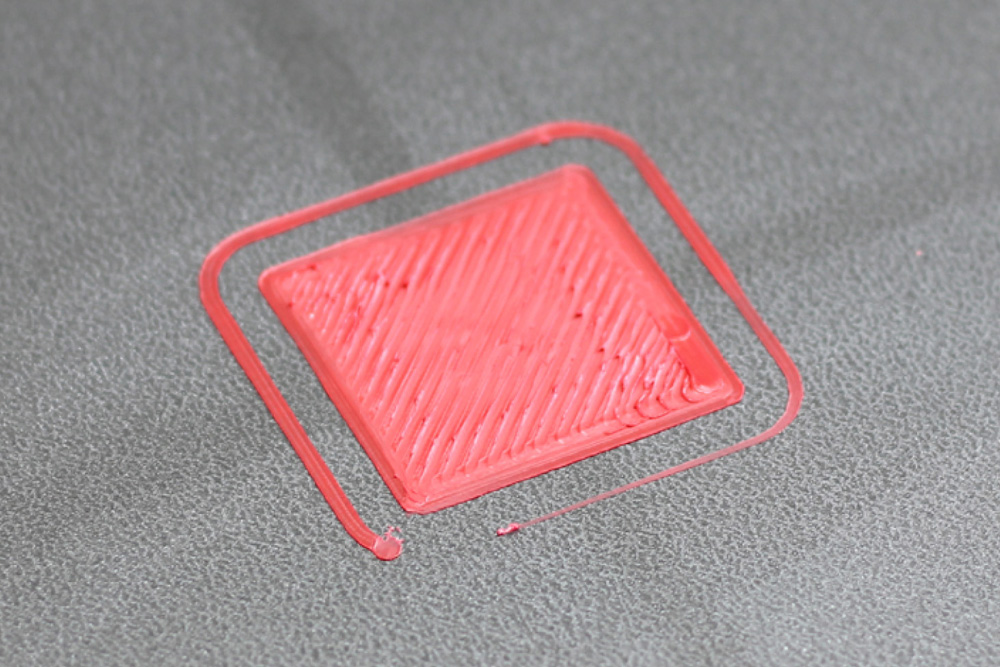
The distance between the heatbed and the hotend is too short (the heatbed is too high):
- The material is pushed out of the hotend during printing the first layer.
- It leads to deformation of the base of the printed model.

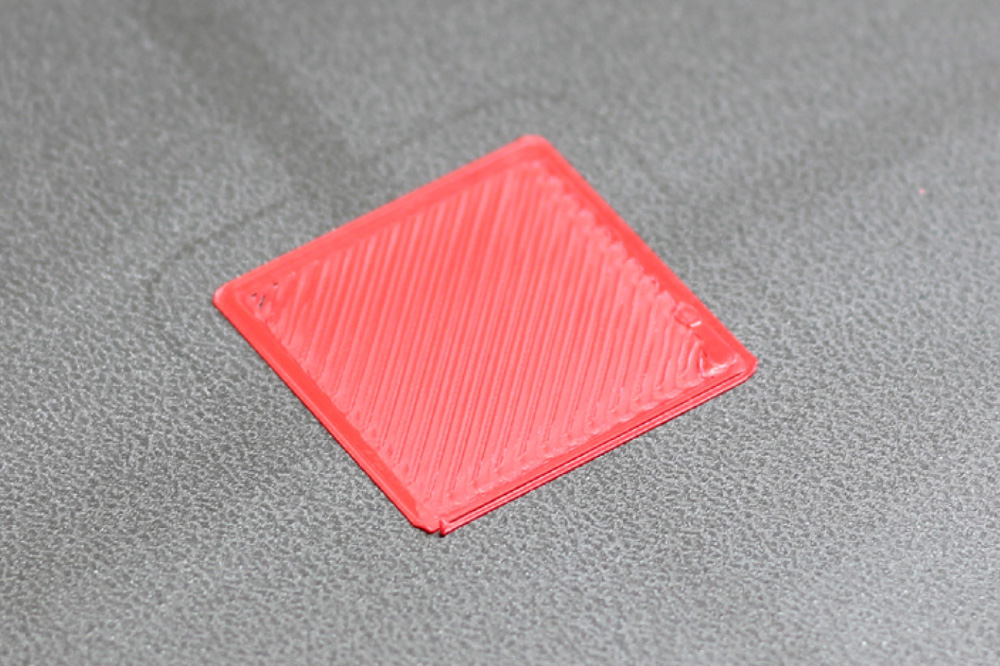
In this case, click the down arrow on the left panel several times until the layer is evenly aligned:

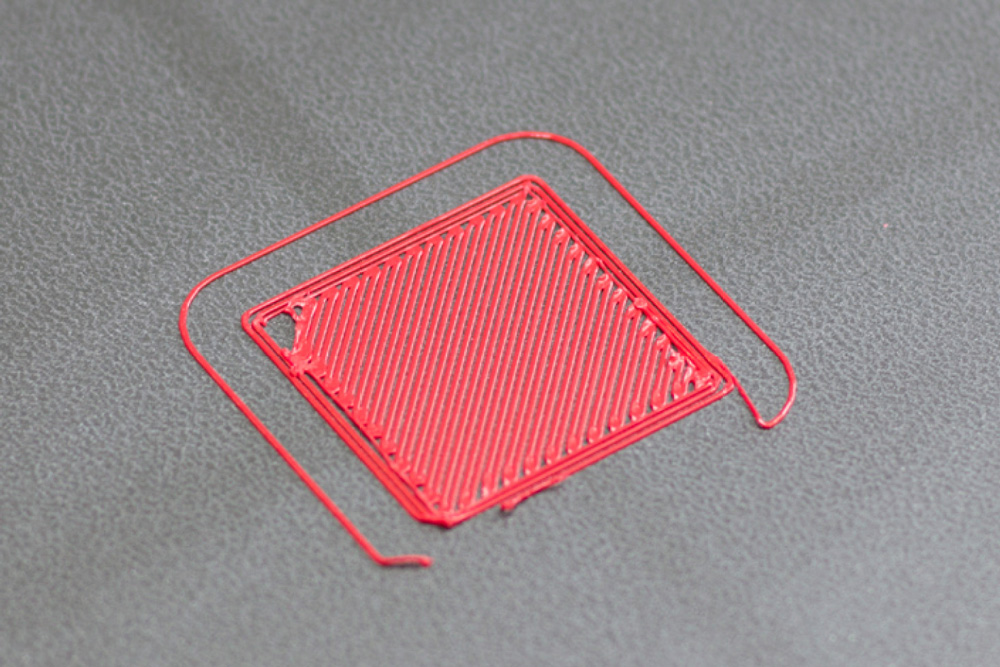
The distance between the heatbed and the hotend is too large (the heatbed is too low):
It causes a weak adhesion of the material to the heatbed. It may lead to the situation that the model could be peeled off during the printing.
In this case, click the up arrow on the left panel several times until the layer is evenly aligned.
What types of material can be used with 3DGence ONE printer?
3DGence ONE printer has an open material base that allows the customer to choose freely among a wide range of the materials available on the market. The only limitation is the filament’s diameter (1.75 mm) and the temperature of the hotend and the heatbed.
How to load the filament?
1. Turn on the printer.

2. Place the filament on a spool holder.
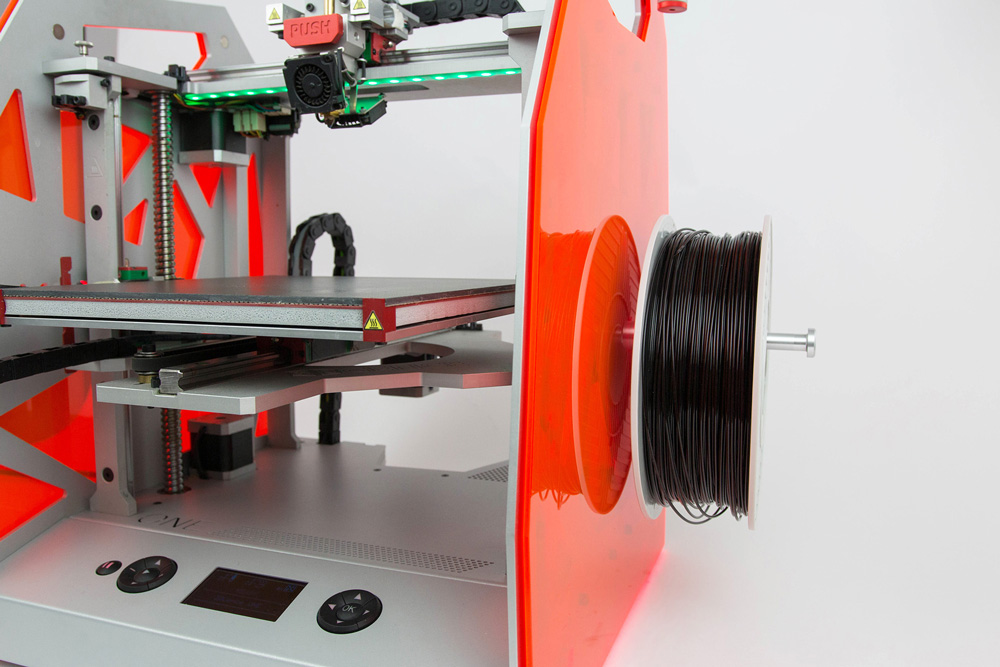
3. Cut off the tip of the filament.
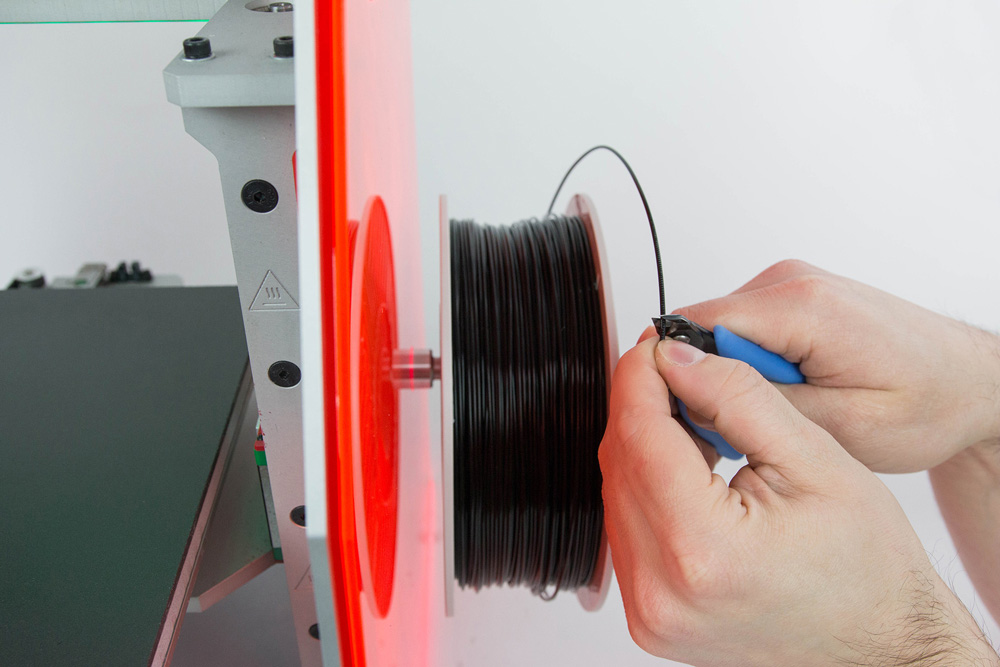
4. Push the pneumatic coupling and pull out the teflon tube at the same time.
5. Insert the filament in the cleaner and pass it through all teflon tube.
In case the filament does not pass through the cleaner tube, follow the instructions below:
I. Remove the teflon tube (1) from the cleaner (3) – by pressing and holding the red clamping ring of the pneumatic coupling (2) and pull the tube out (1).
II. Unscrew the cleaner’s nut (4) and remove the sponge inlay (3).
III. Pass the filament through the hole of the cleaner’s cap (4) and then pierce the sponge located in the cleaning tool with the tip filament.
IV. Pass the filament through the sponge (3), insert the filament and the sponge to the cleaner and tighten all with the cleaner’s nut (4).
V. Push the filament through the teflon tube (1), straighten the end of it and insert it to pneumatic couple (2).
6. Straighten up the end of the filament.
- Use the filament change assistant by choosing following commands from printer’s menu:
OK – Prepare – Load filament
then follow the instructions displayed on the screen:

The device will heat up the hotend to 240°C. Next:
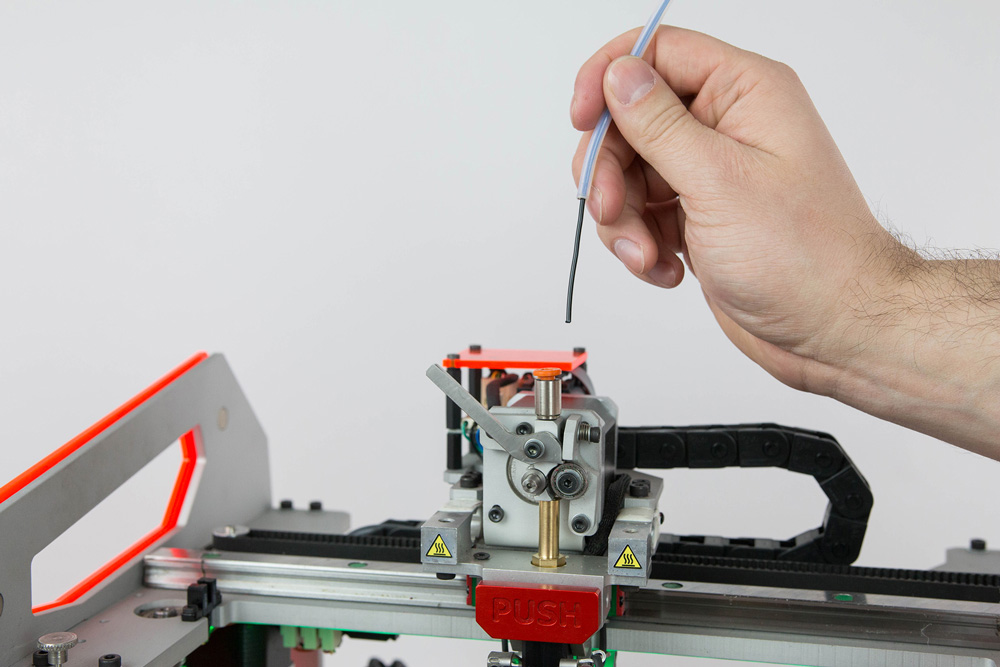
- Open the extruder by moving its lever to the left (counter clockwise).
- Straighten the end of the filament and insert it to the hotend (min. 5 cm from inlet of extruder).
- Close the filament inside the extruder by moving the lever right (clockwise).
- After the hotend is sufficiently filled with the new material (approx. 5 cm of filament should be pushed through when changing the color of the filament). Press „OK” button to stop loading filament procedure.
- Remove the material leak from the nozzle with the tweezers.
- Filament loaded successfully. Press „OK” button.
How to unload the filament?
- Turn on the printer.
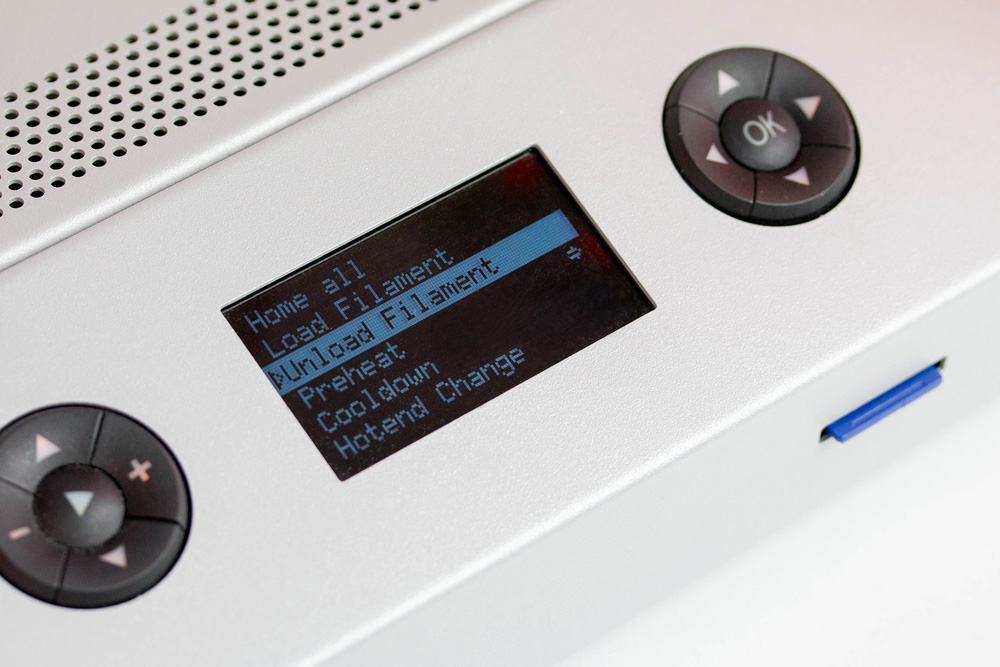
- Use the filament unload assistant by choosing following commands from printer’s menu:
OK – Prepare – Unload filament
then follow the instructions displayed on the screen.
WARNING: The device will warm up the hotend to 240°C and then it will start extruding a few millimeters of material. This prevents from any possible blocking of material in the nozzle.
- Open the extruder by moving the lever to the left (counterclockwise),
- Firmly grasp the filament on the hotend, pul lit out with one vigorous stroke and press „OK” button.
Always store the filament in a dry and dark place. The filament may absorb humidity or be deformed when exposed to sunlight. In both cases, the use of such a filament may cause difficulties or faults such as not adhering to the working table.
WARNING: Do not remove the filament from the inside of the hotend without heating the hotend and opening extruder lever! It may damage the hotend. Hotend should not remain heated, regardless of whether it is full of printing material or empty. The hotend can be heated for a long time only in the process of print (during extruding of heated printing material).
How to change the filament during printing process?
The material on the spool may run out before the printout is finished. For quick replacement of filament spool or changing the color of filament (in two color or multicolor prints), use filament change assistant. The current printing will be paused without cancelling printing operation. Printing is restored after confirming and closing filament change assistant. Before starting printing the system displays the amount of material required to complete a particular printing object. Make sure that you have enough printing material.
- Choose following commands from printer’s menu:
OK – Filament Change – OK.
Printing will be paused and all mechanisms will go to their safe points. - Open the extruder by moving its lever to the left.
- Pull out the filament with one vigorous upstroke.
- Place the new filament spool on the handle and pass its loose end through the cleaner and the teflon tube. Straighten the tip of filament. Make an even cut on the tip if necessary.
- Insert at least 5 centimeters of filament to the extruder.
- Close the extruder by moving the lever to the right and press „OK” to confirm. The printer will extrude a certain amount of filament for correct filling the printing head.
- Remove the material leak from the head with the use of tweezers. Confirm completing the procedure by pressing “OK” button.
3DGence ONE printer will continue printing with the new material from the point, where the process was stopped for changing filament. It is recommended that the filament should be replaced at the stage of printing the filling (for the purpose of masking the transitions between different materials).
How to supervise the first layer?
When printing starts, keep the first layer aligned by adjusting the height between the hotend and the heatbed by using the up and down arrow to move the hotend.
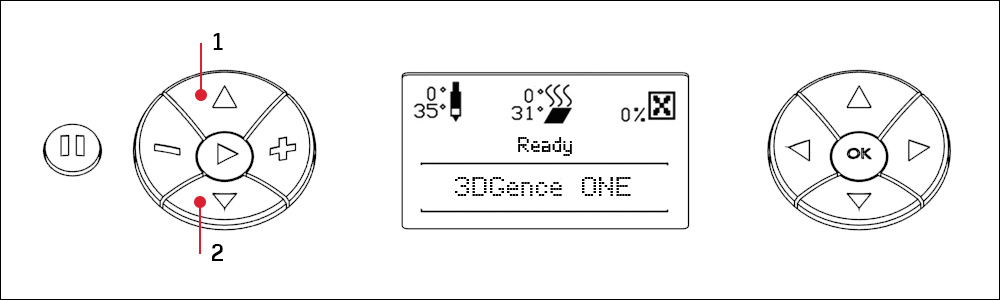
Up arrow on the left (1) – movement of the heatbed upwards, one click of a 0.025 mm movement, allows you to adjust the height of the table during printing (the button only works after Z axis depreciation).
Down arrow on the left (2) – Movement of the heatbed down, one click of 0.025 mm, allows you to adjust the height of the heatbed during printing (the button only works after Z axis depreciation).
The distance between the heatbed and the hotend is too short:
- the material is pushed out of the hotend during printing the first layer,
- it leads to deformation of the base of the printed model.
In this case, click the down arrow on the left panel several times until the layer is evenly aligned:
The distance between the heatbed and the hotend is too large:
- it causes a weak adhesion of the material to the heatbed. It may lead to the situation that the model could be peeled off during the printing.
In this case, click the up arrow on the left panel several times until the layer is evenly aligned:
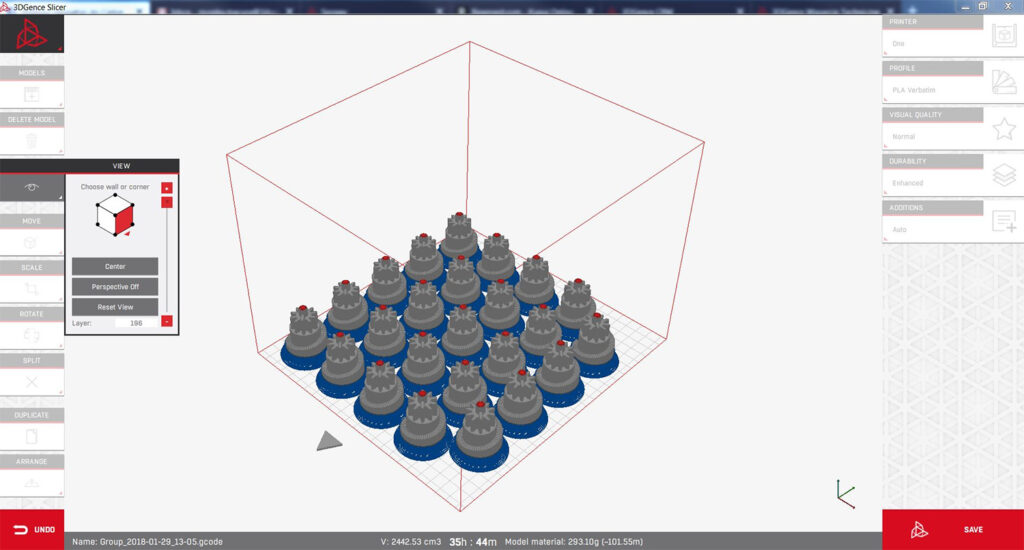
Is it possible to print several models at the same time?
During the process of preparing of the model you should add necessary quality of elements and place them on the heatbed.
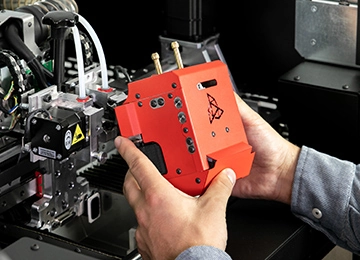
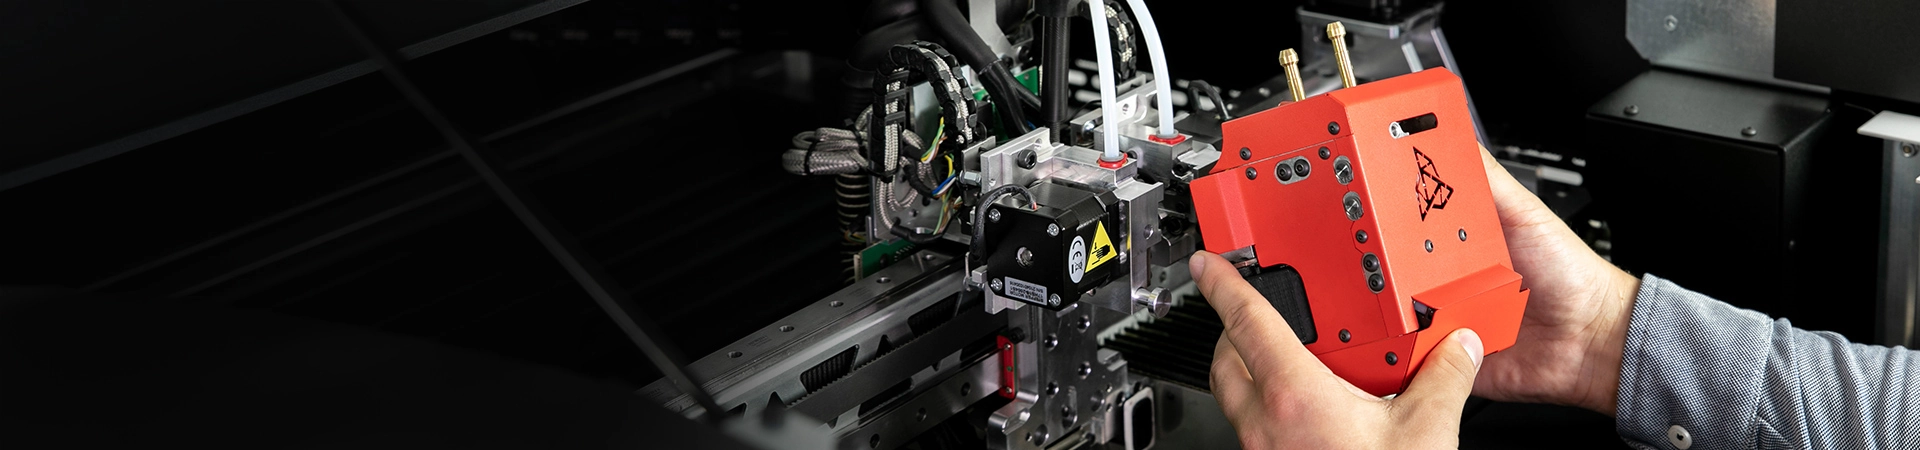
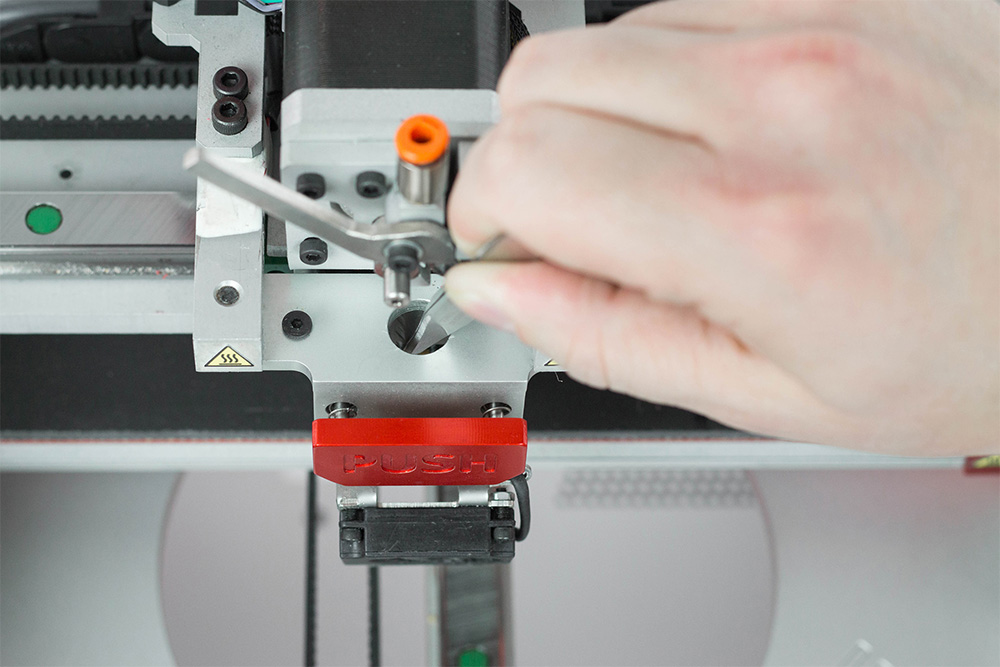
How to replace the hotend?
1. Unload the filament (see FAQ: „How to unload the filament”).
2. Choose „Hotend Change” from „Prepare” menu and follow the instructions displayed on the screen:
a) wait for the hotend to cool down,
b) turn off the printer.
3. Wear protective gloves.
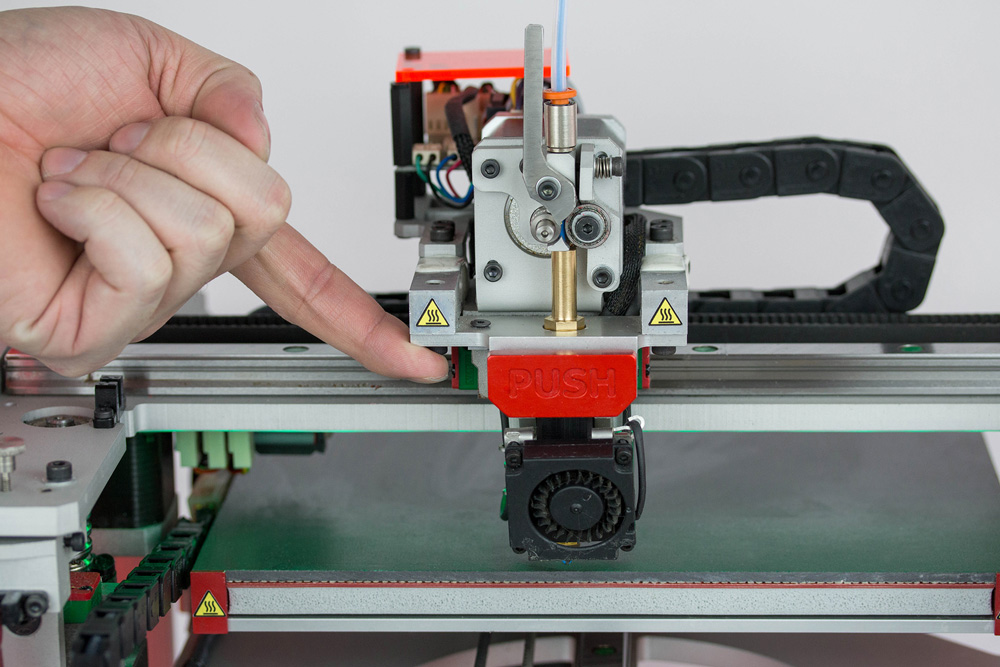
4. Press and hold the red PUSH button. With the other hand, slide the hotend out of the block. Do it carefully – so as not to drop the hotend on the table.
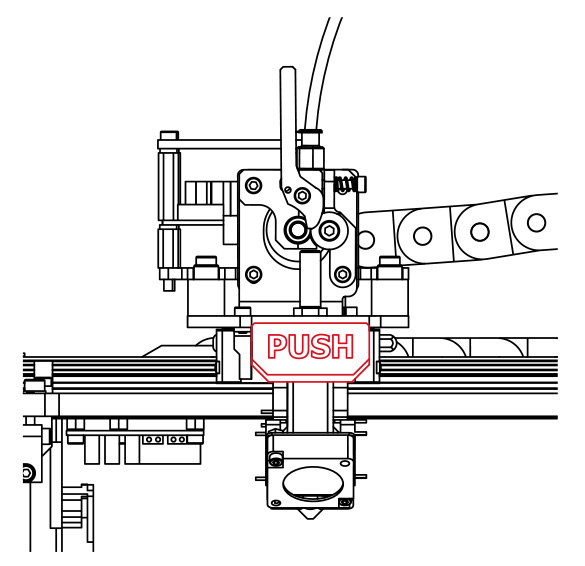
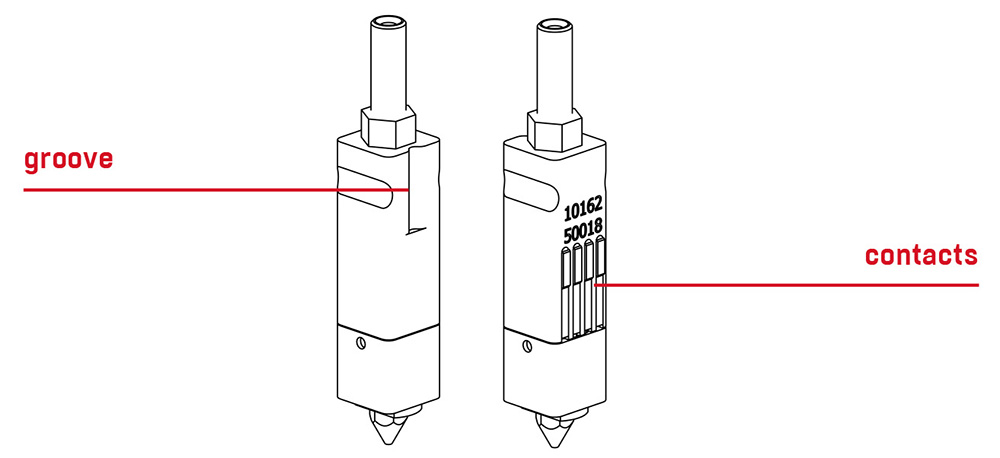
5. Slide the new, clean hotend into place until it stops. The groove in the hotend must be pointing towards you (the front of the printer). Hold down the PUSH button for the time of entire process – otherwise the head may be misplaced.

WARNING! Take special care while inserting the hotend. To avoid contacts bends, the hotend must be kept in a vertical position. In case damage the contacts ora incorrect mouting the hotend in the display will be the “def” error (error indicating no tepmerature sensor reading) at the temperature display.
6. Release the PUSH button when the hotend is correctly attached to the block.
7. Hotend replacement has been completed. Now you can turn on the power and run the printer. Remember to always specify the diamenter of the nozzle to be used in the software.
What the printing’s time depend on?
The time needed to print a 3D model depends on a number of factors:
– the size and shape of the model,
– nozzle diameter,
– the height of the layer,
– percentage of infill in the model,
– print speed.
What are the buttons on the printer’s main panel?
Right panel
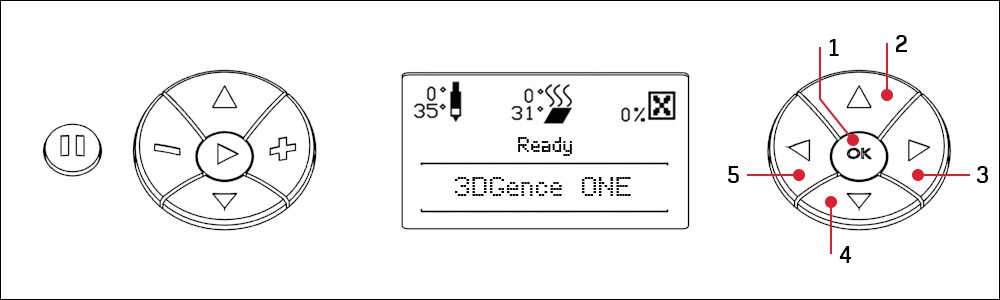
Buttons in this group are for navigating MENU. They provide access to all parameters in the menu and allow adjusting their values.
Function of buttons:
- Entering to menu and confirming selection.
- Upwards menu navigation button and values increase.
- Instant file preview on SD card.
- Downwards menu navigation button and values decrease.
- Menu navigation button – menu return.
Left panel

WARNING: Left control panel operates outside of traffic restrictions (by micro switches), damage caused by improper use is not covered by the warranty (buttons from 1 to 4).
Functions of buttons:
- Upwards table adjustment button, one click moves the table by 0,025mm, which enables adjusting the height of the table during printing process (the button is active after referencing Z axis).
- Add filament button (active after the hotend reaches 185°C). Allows control of feeding the material during printing. The button allows to fill the unfinished spaces/losses on individual layers or fill up the print head before the commencement of printing.
- Downwards table adjustment button, one click moves the table by 0,025mm, which enables adjusting the height of the table during printing (the button works after referencing Z axis).
- Filament recognition button (active from 185°C). Allows removing material from the head.
Applies to PLA material, in the case of ABS, set hotend temperature to 240°C to use quick access keys.
WARNING: Buttons in point 2 and 4 are to be used after the head has warmed up to the temperature recommended by the manufacturer of the material. If not used properly, it may cause damage to the hotend.
PAUSE and START buttons
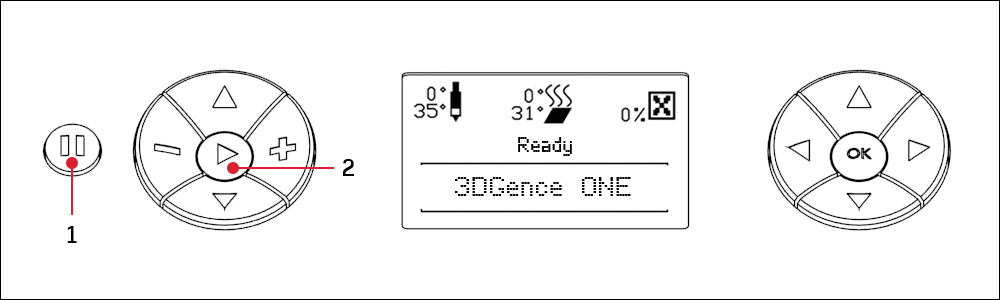
To increase functionality and facilitate the use of the printer, 3DGence ONE unit has been equipped with PAUSE button (1) that has the following functions:
• a single – press will stop the printing process,
• a double – press will hold the printing process and the departure of the nozzle to X and Y axes base position.
This function allows modifying the printed object e.g.: inserting a cap (or other object) to a specially prepared socket and further printing on the surface of the inserted object, changing the color of the filament, or, if the printing material runs out, replacing an empty spool. However, for the replacement of printing material it is recommended to use filament replacement guide „Filament change” from the MENU. Note that the added objects cannot protrude beyond the currently existing printing surface; otherwise the hotend can collide with the added object and be damaged.
When changing the printing material, it is recommended to hold the printing process at the stage of printing the filling, which reduces the risk of possible defects on the surface of printing model.
WARNING: Always wear protective gloves for any manual operations within the working area. To resume the printing process press START button 2, regardless of whether PAUSE button was pressed once or twice.
What to do if any problem with the printer occurs?
- Report a problem with the device using the form available on the website www.3dgence.com/support in Report problem category.
- Wait for the initial diagnosis and response from 3DGence support.
- When 3DGence support has confirmed that the device has to be sent to the service, send the device within 10 working days to the following address:
- The necessary conditions for accepting the printer on the service repair are:
– registering the device at www.3dgence.com/support and adding a proof of purchase during registration,
– decision of the 3DGence support department about the necessity of sending the device on the service repair,
– filling out the service request form received by e-mail and attachnig it to the package,
– sending to the address: support@3dgence.com information about sending the device on the service repair at least one day in advance. - Sending a printer to the service is synonymous with reading and accepting the regulations included in the service request.
How to clean the heatbed?
A dirty or greasy surface of a heatbed can seriously impair or make impossible the printing process. It is recommended to clean the heatbed if the model does not fit properly into the heatbed.
The heatbed should be cleaned according to the instruction below:
- Turn off all heating elements and wait until they are completely cooled down. Use “Cooldown” option from the menu.
- Turn the device off by pressing the power button and unplug the printer from the power source.
- Use protective gloves.
- Use the spatula to clean the surface of the heatbed from any residual material.
- Then:
a) soak the cotton cloth with alcohol and wipe the table (wait until the alcohol has completely evaporated) or
b) soak cotton cloth with detergent (dishwashing liquid) and warm water, firmly squeeze out excess water and clean the table, then rinse the cloth in the water to wipe the table and wait to dry it.
WARNING! Do not allow water to enter the electronics of the appliance and the enclosure.
Do not clean the table:
– gasoline,
– acetone,
– nitro.
We do not recommend cleaning the table:
– denatured,
– isopropanol.
When degreasing the table, pay special attention to avoid spreading solvent cleaners on any plastic and painted elements of the printer as it could damage them. Always read and observe safety instructions on solvent containers – solvent fumes may be harmful.
How to clean a hotend?
Cleaning of a hotend is recommended each time after finishing printing for the purpose of removing any remains of molten/burned material stuck to the outer surface of the nozzle.
For this purpose:
- Use protective gloves.
- Choose following commands from printer’s menu:
Ok – Tune – Temperatures – Nozzle – Ok and use the up arrow to set the appropriate temperature – depending on the material currently in the nozzle (PLA – 220º, ABS – 240º, for other materials as recommended by the manufacturer). - Secure proper access to the hotend. Use options:
Ok – Prepare → Park Heatbed → Middle or Bottom. - Gently remove the molten/burnt remains of material using non-combustible cloth, metal spatula or tweezers.
- Turn off the heating after cleaning the hotend (To do this use Cooldown function from printer’s menu).
How to preserve the printer?
– do not touch the guide gears, ball screws and bearings without gloves, as this may lead to corrosion,
– all maintenance of the printer should be done in gloves,
– before starting any maintenance work, disconnect the power source,
– keep the guides and ball screws clean – once for every 3 months (depending on how often you use the printer), wipe the axle guides and the ball screws with a dry cloth to remove dust and then use a cloth with a bit of grease and similarly lubricate the components with special grease for linear guides (eg. grease G05).
– do not use: dry grease, teflon grease, graphite grease, copper grease,
– it is advised to protect the filament from moisture, dust and other dirt,
– in case the printer will not be used for a long time, it is recommended to secure the guides and ball screws so that dust and other dirt does not settle on them,
– in case of filament problems, make sure the knurl is not dirty with filament, if the filament breaks, check ifthe extruder’s spring is not deformed by continuous pressure and, if necessary, replace with a new one attached to the printer,
– check the condition of the V-belts once of 3 months, in case of damage, contact the service center.
– once in a while check the cleaner if it is dusty (screw the red nut and clean it or replace it with a new one).
– once in a while, wipe the entire printer with a damp cloth excluding screws and ball nuts, guides and liners, and other steel mechanical components
– if the anodized elements lose color, they should be wiped with silicone oil.
What does the lighting of the heatbed mean?
3DGence ONE is equipped with LED backlight which is simultaneously a form of signalization and illumination.
Meaning of particular colors:
- green – heatbed’s temperaturę is safe (below 40°C),
- red – heatbed’s temperaturę is over 40°C (risk of burning),
- white – printer is working – heatbed is hot (risk of burning),
- yellow – temperature’s read-out error, crush of heating devices.
WARNING! Hotend may still be hot besides the change of lightning. The color of the lightning informs the user only about heatbed temperature, not about temperature of the hotend.
WARNING! The heatbed and the hotend are still hot even after the end of the printing process. You should check the temperature of the hotend and the heatbed before touching them.
WARNING! Directly after the printing process the cooling process starts automatically. The lightning of printer’s working area will be red until the time that user can remove the model safety. When the printer achieves the safety temperature the lightning will turn green.
Where is the latest version of the printer firmware?
The latest printer firmware is in the FIRMWARE category: https://3dgence.com/support/firmware.html
The FIRMWARE category is available after creating an account and registering the device.
Is it possible to stop and start the printing process?
In order to stop the printout the user should press STOP button. The printout restarts after pressing the START button, not matter if the STOP button was pressed once or twice.

STOP button has two functions:
• stopping the printout by single pressing,
• stopping the printout and moving the hotend towards base position of X and Y axis by double pressing.
This function allows additional actions with the printout such as putting the nut or other element into the printout, changing filament color or replacing empty spool. However we recommend using filament changing assistant by choosing ‘Filament change’ from the menu. Remember that any added element should not stick out from the printout otherwise the hotend may collide with it and get damaged.
While replacing the filament for another we recommend to stop the printout during the process of printing of the infill, that will decrease the risk of potential defect on the surface of the model.
What does the temperatures on the display mean?
LCD display enables accessing all MENU functions and direct control of important parameters of 3DGence ONE printer such as hotend and heatbed temperature. Location of particular parameters on LCD panel is presented below.
After starting the printer it displays the following information:

3DGence ONE printer displays the following information:
- Set hotend temperature,
- Current hotend temperature (as indicated by temperature sensor),
- Set heatbed temperature,
- Current heatbed temperaturę (as indicated by temperature sensor)
- Blow power of cooling fans (%).
After starting printing, LCD panel displays the following information:
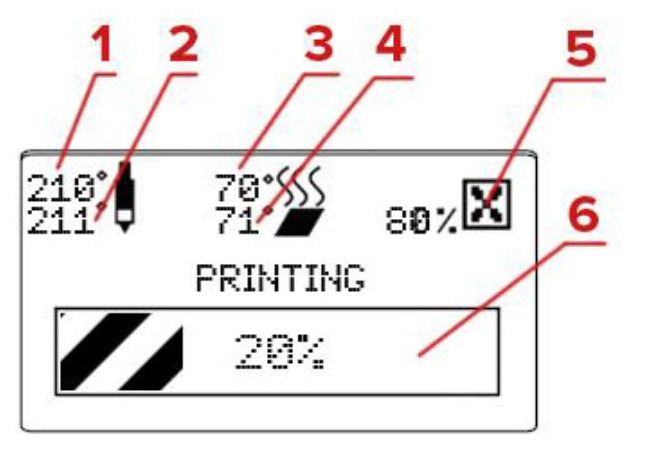
Information currently displayed:
- The introduced hotend temperature,
- Current hotend temperature (as indicated by temperature sensor)
- The introduced heatbed temperature,
- Current heatbed temperature (as indicated by temperature sensor)
- Blow power of cooling fans (%).
- Printing progress panel (graphic presentation and percentage).
Temperature parameters and fan power can be changed during the printing process. Parameters can be manually adjusted for the purpose of printing process optimization. For example, strong airflow should not be used during printing the first layer, for this reason the obtained read may be 0%. Machine code automatically starts the cooling fan at the appropriate stage of printing. Fan settings can be changed from the MENU – „Fan Speed”.
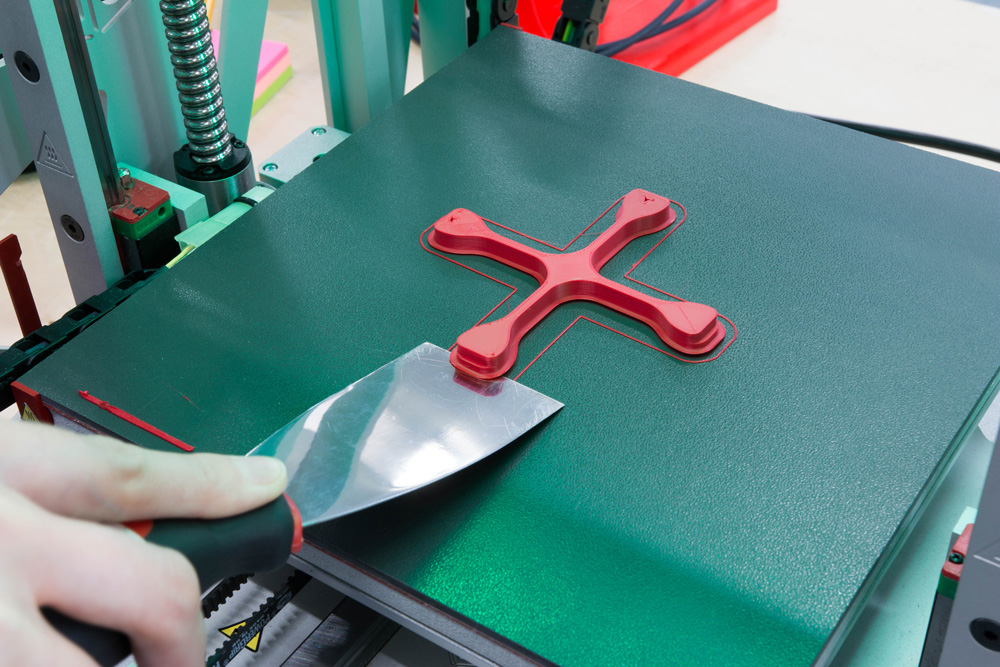
How to remove the model after printing?
The cooling sequence starts immediately after finishing the printing process. The work field of the printer remains highlighted in red until the temperature is safe for removing the printout from the work table. Except the color of highlighting while the device cools down, information on cooling progress is displayed on the printer’s panel. When the temperature of printer is safe, the device lighting turns green and the panel displays message Remove Model. Always wear protective gloves when removing the printed object from the work table!
WARNING! The cooling sequence can be skipped after finishing printing. To do this select, the option Skip Cooling from the printer’s menu. However, only experienced operators are allowed to use this option. To prevent any accidental burns, make sure that the printing head is cooled down and withdrawn to zero position of X-axis (maximum left).
In order to remove the printout from the table, use the attached spatula to gently pry the object up from several sides. Never use sharp corners of spatula – use only the flat edge of the tool. Never remove the printout by force, as this may damage the work table. In case of problems with separating the printout from the table, it is recommended to reheat the work table and cool it down again. Reheating the table can be repeated several times and may prove necessary for solids with large surface base, the base of printout should be constantly pried up with a spatula when the device is cooled.
WARNING! Do not touch the table surface with bare hands! Any undesired substance spread on the surface of work table may affect its adhesive/adherent properties necessary for the correct printing process. Always use clean protective gloves to ensure that printed objects shall properly adhere to the table.
What does E201 on the display mean?
E201 – problem with force measurement on the load cells.
In the case of error E201 – the indication of load cells should be checked according to the instructions below.
Load cells operation capability should be checked with the extruder’s lever pulled out to the left.
1. Check the indication of the load cells by choosing following commands from the printer’s menu:
OK – Configuration – Hardware Test – F (value)
The static indication of the load cell marked F should be within the range: from -1500 to 3000 units.
2. Check the correctness of load cells acting:
• With the load cell activated, press with the finger from the top of the left load cell and observe the indication. With such pressure, the indication should increase significantly (by several thousand units).

• Then, lift the left load cell with finger from below to observe decrease of indication.
Similarly, check the right load cell.
If the state indication of the load cell is not within the given range – it is too high or too low and/or the value of the indication under the finger pressure is not changing significantly (few thousands) – contact the 3DGence service (overlap: REPORT PROBLEM).
In the event of an E201 error message when starting the Heatbed Scan, you must additionally:
– check if the fan does not squeeze the Y-axis guide,
– check if the hotend is not dirty.
What does E202 on the display mean?
E202 – the position of hotend is out of range, incorrect height above the heatbed.
Adjust the leveling of the heatbed in all four corners according to the Z – axis limit switch adjustment manual included in MANUALS overlap.
Contact 3DGence Service (overlap: REPORT PROBLEM) if:
– the problem exists after the adjustment of the Z – axis limit switch.
What does E203/def on the display mean?
E203 – error of the temperature sensors. Problem with the temperature measurement.
Instead of the information about the E203 error, the information about def on hotend can appear. The message informs about problem with temperature, heater or thermistor.
In case of appearance the information about error:
• Check if the hotend is positioned correctly in the block:
– inserted until the end and directed the groove forward and the connectors backward.
• Check if the error appears on the other hotend.
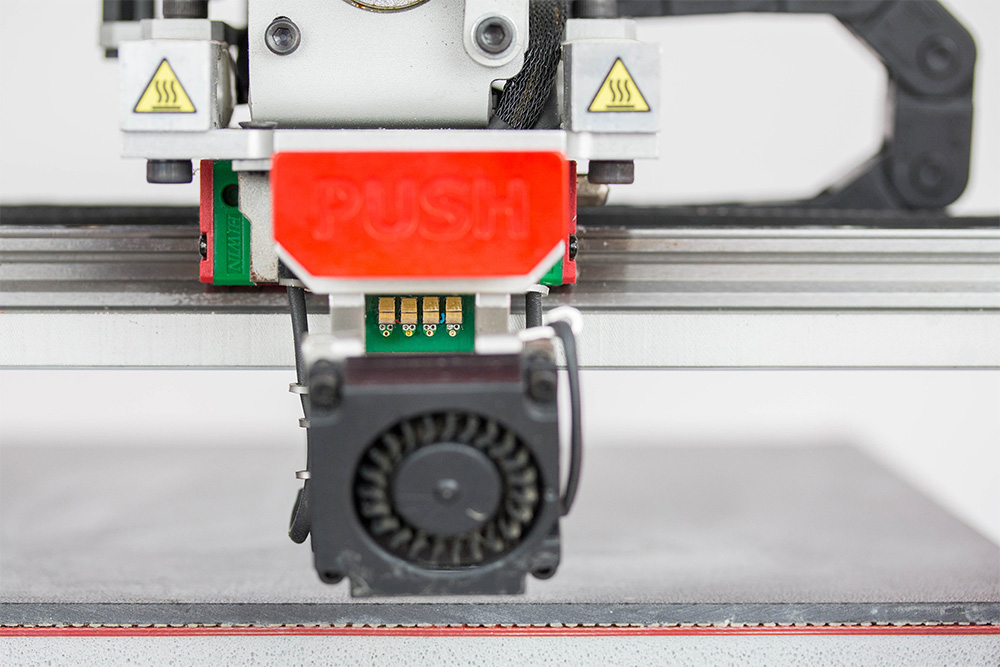
• Check if the connectors in the hotend block are damaged, burned or bent.

If the connectors are bent you can:
1. Turn off the printer and unplug the printer from power supply.
2. Pull out the hotend from the block.
3. In the hotend block from top gently bend the connectors to your side using tweezers.

4. Insert the hotend to the block.
5. Turn on the printer.
6. Check if the problem disappeared.
Contact 3DGence Service (overlap: REPORT PROBLEM) if:
– the same error is on another hotend,
– the bend of the connectors did not help,
– connectors are damaged: broken or burned.
What does Killed on the display mean?
Error Killed – means that the autocalibration procedure has not run correctly.
Causes of killed:
1. No Heatbed Scan has been done after uploading a new firmware to the printer.
Run a Heatbed Scan choosing following commands from printer’s menu:
Ok – Calibration – Heatbed Scan.
2. Incorrect height of hotend above the heatbed.
Adjust the leveling of the heatbed in all four corners according to the Z – axis limit switch adjustment manual included in MANUALS overlap.
3. Problem with force measurement on load cells.
The indication of load cells should be checked according to the instructions below.
Load cells acting should be checked with the extruder’s lever pulled out to the left.
1. Check the indication of the load cells by choosing following commands from the printer’s menu:
OK – Configuration – Hardware Test – F (value)
The static indication of the load cell marked F should be within the range:
from -1500 to 3000 units.
2. Check the correctness of load cells acting:
• With the load cell activated, press with the finger from the top of the left load cell and observe the indication. With such pressure, the indication should increase significantly (by several thousand units).

• Then, lift the left load cell with finger from below to observe decrease of indication.

Similarly, check the right load cell.
Contact the 3DGence service (overlap: REPORT PROBLEM) if:
– the problem still appears after doing the Heatbed scan,
– the problem still appears after adjusting the Z-axis limit switch,
– the state indication of the load cell is not within the given range – it is too high or too low and/or the value of the indication under the finger pressure is not changing significantly (few thousands).
What to do if there is a temperature change on the display?
In case of temperature bounced:
• Check if the problem appears on two different hotends.
• Check if the connectors in the hotend block are damaged, burned or bent.
If the connestors are bent:
- Turn off the printer and unplug the printer from power supply.
- Pull out the hotend from the block.
- In the hotend block from top gently bend the connectors to your side using tweezers.
4. Insert the hotend to the block.
5. Turn on the printer.
6. Check if the problem disappeared.
• Check if the IDC tapes are damaged:
For this purpose it is necessary:
1. Turn on the printer.
2. Preheat the printer by choosing following commands from printer’s menu:
OK – Prepare – Preheat – Preheat PLA.
3. When the printer is heated, move the X-axis carriage very slowly from left to the right and back. Check if there are the bounce of temperatures on the display.

Contact 3DGence Service (overlap: REPORT PROBLEM) if:
– temperature bounced also appear on other hotends,
– the bend of the connectors did not help,
– connectors are damaged: broken or burned,
– there are temperature bounce when the carriage is moving on the X-axis from left to right.
What to do if the hotend does not heat up?
If the hotend does not heat up:
• Check if the problem appears on two different hotends.
• Check if the connectors in the hotend block are damaged, burned or bent.

If the connestors are bent:
- Turn off the printer and unplug the printer from power supply.
- Pull out the hotend from the block.
- In the hotend block from top gently bend the connectors to your side using tweezers.

4. Insert the hotend to the block.
5. Turn on the printer.
6. Check if the problem disappeared.
Contact 3DGence Service (overlap: REPORT PROBLEM) if:
– lack of heating also appear on other hotends,
– the bend of the connectors did not help,
– connectors are damaged: broken or burned.